Did you know that millions of pumpkins get carved every single year, and most people just throw the slimy guts straight in the trash? I gotta admit, the seeds was just thrown away by me too for the longest time. I used to make that exact same mistake every autumn with my kids until I figured out how to make the absolute best Cinnamon and Xylitol Roasted Pumpkin Seeds right at home. Now, I literally scrape every last shell I can find because baking these sweet, sugar-free treats has become our favorite fall habit. It was a little tricky to learn how to make them at first, but I’m gonna show you exactly how to prep and bake your own Cinnamon and Xylitol Roasted Pumpkin Seeds so you can enjoy a super crunchy, healthy snack without the bad sugar crash.

Cleaning and Prepping Your Raw Pumpkin Seeds
The Messy Part of Fall Baking
I gotta admit, I used to just chuck my pumpkin guts straight in the trash. It was always such a sticky, gross mess. Who has the time to pick through all that orange slime?
But then I realized I was throwing away the absolute best part of the pumpkin! Making Cinnamon and Xylitol Roasted Pumpkin Seeds is my favorite fall habit now. It just took a little trial and error to get the prep right.
My biggest mistake early on was trying to clean them dry. I spent hours scraping seeds with a spoon, getting super annoyed. It was honestly a complete disaster.
The Secret Water Trick
Then a friend told me about the water trick, and it blew my mind. You just dump the whole mess into a massive bowl of cold water. The raw pumpkin seeds float right to the top while the heavy junk sinks.
It saves so much time, you guys. The seeds are then scooped off the top with a slotted spoon. Easy peasy.
You want to dry them completely though. I learned that the hard way when I ended up with soggy seeds that wouldn’t crisp up in the oven. Soggy seeds are pretty sad.
Why Boil Them First?
Here is a tip that totally changed the game for my crunchy keto snacks. You need to boil the seeds in salted water for about ten minutes before roasting them. It sounds crazy, but the salt gets inside the shell and makes them pop perfectly later.
The boiling process was discovered by me after reading a bunch of old cookbooks. It breaks down the tough outer layer so they aren’t so chewy. Plus, it makes them way easier to digest.
Did you know that just one ounce of pumpkin seeds has about 7 grams of protein? They also pack a solid 18% of your daily magnesium needs. That’s why I love turning them into healthy fall snacks for my family.
Drying Before Seasoning
After you boil them, lay them out on a clean dish towel. Don’t use paper towels unless you want pieces of paper stuck to your food. Yeah, I did that once, and we were picking lint out of our teeth all night long.
Let them air dry for at least an hour. The drier they are, the better your sugar free autumn treats will turn out. The spices stick way better when there’s no moisture fighting them.
Preparing these sweet keto snacks doesn’t have to be a headache. I know the prep work is annoying. But making these is a great way to use up carving pumpkin leftovers.
Getting Ready for the Sweet Coating
I really prefer using xylitol because it bakes just like real sugar. It gives you those sweet roasted pumpkin seeds without the crazy blood sugar spike. Perfect if you need diabetic friendly snacks around the house!
Just remember that xylitol is super toxic to dogs. I keep my pups locked out of the kitchen when I’m baking with it. Safety first!
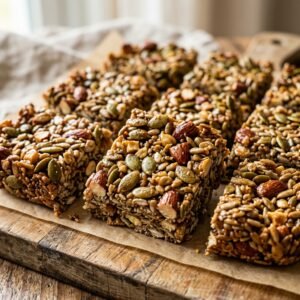
Once your seeds are totally dry, they are ready for the fun part. Throwing them in a bowl with butter, cinnamon, and sweetener is the best feeling. I promise the crunch of your Cinnamon and Xylitol Roasted Pumpkin Seeds is totally worth all the effort of cleaning them.

Mixing the Perfect Low-Carb Cinnamon Coating
My First Batch Was a Disaster
Let me tell you a little secret about making Cinnamon and Xylitol Roasted Pumpkin Seeds. Getting the sweet coating right is honestly the trickiest part of the whole process! My very first try was an absolute train wreck.
I didn’t measure a single thing. I just dumped a huge pile of ground cinnamon and powdered sweetener into a bowl and hoped for the best. Big mistake, you guys.
The seeds was completely covered in this thick brown sludge that honestly tasted like actual dirt. I was so frustrated I almost cried right there in the kitchen. I ended up tossing that whole burnt tray out into the yard for the neighborhood squirrels.
Understanding Your Sweetener
You see, xylitol doesn’t act exactly like regular white sugar. It is a sugar alcohol, which means it behaves a little differently when things get hot in the oven. But it melts and caramelizes beautifully if you treat it right.
This gives you that awesome, hard candy crunch for your sugar free autumn treats. You just have to make sure the pumpkin seeds are coated super evenly before baking. A simple mix of melted butter, your sweetener, and a little dash of cinnamon is used by me now.
The melted butter is the glue that helps the xylitol stick to the slippery shells. Did you know xylitol has a glycemic index of just 7? That makes these Cinnamon and Xylitol Roasted Pumpkin Seeds the perfect diabetic friendly snacks to keep around the house.
Finding the Golden Ratio
So what exactly is the secret formula? After ruining like three batches, I finally figured it out. I’ve found that exactly one tablespoon of melted butter per cup of raw seeds is the absolute sweet spot.
Then, you gently whisk in two tablespoons of xylitol and only half a teaspoon of ground cinnamon. Don’t go crazy with the cinnamon, seriously! Too much spice will make your keto friendly treats taste incredibly bitter and weird.
You just want a warm, cozy fall flavor. I always like adding a tiny pinch of sea salt to the bowl, too. The salt really makes the sweetness pop on your tongue.
It’s like those fancy sweet and salty seeds you buy at the store, but way cheaper to make at home.
Getting Your Hands Dirty
Once your wet and dry ingredients are mixed up, dump your dry seeds right into the bowl. You gotta toss them around until every single seed is shiny and wet. The stirring is done by my kids usually, because they just love making a huge mess.
Make sure you scrape the very bottom of the mixing bowl with a rubber spatula. The cinnamon really likes to hide down there in clumps. If you don’t mix it super well, some of your Cinnamon and Xylitol Roasted Pumpkin Seeds will be plain and boring.
And honestly, nobody wants a naked pumpkin seed. Getting this low carb snacks coating right takes just a little bit of patience.
But it is so worth it when you pull that golden, bubbling tray out of the hot oven. I promise these Cinnamon and Xylitol Roasted Pumpkin Seeds are seriously the best crunchy keto snacks you will ever eat.

Mastering Baking Times and Oven Temperatures
My Oven Disaster
Let me tell you about my oven. I swear it has a mind of its own sometimes. When I first tried baking Cinnamon and Xylitol Roasted Pumpkin Seeds, I was super impatient. I just cranked the heat way up to 400 degrees because I wanted them done fast.
Big mistake, you guys. The whole kitchen filled up with thick smoke in like ten minutes. The sweetener burned to an absolute crisp and set off the fire alarms. It was not my best moment.
The Low and Slow Secret
Xylitol is super picky about heat. You gotta keep the oven temperature low and slow. I finally figured out that exactly 300°F is the magic number.
It slowly toasts the inside of the shell without burning the sweet coating on the outside. If you go any higher than 300°F, the xylitol turns bitter and gets really dark. Baking at a lower temperature takes a little longer, but your Cinnamon and Xylitol Roasted Pumpkin Seeds will taste a million times better.
I usually spread my seeds out in a single layer on a metal baking sheet. Make sure you line it with parchment paper first! If you don’t use parchment, the melted sweetener will cement the seeds straight to your pan, and you will be scrubbing for days.
Why You Gotta Stir
Here is another thing I learned the hard way. You can’t just shove the pan in the oven and walk away to grade papers or watch TV. The seeds needs to be stirred halfway through the baking time.
I usually set a kitchen timer for 20 minutes. When it beeps, pull the hot pan out and use a rubber spatula to flip everything around. Stirring is super crucial because it stops them from baking together into one giant, hard clump.
It also pushes the seeds on the outside edges into the middle so everything cooks evenly. If you forget to stir, the edges will burn while the middle stays sad and soggy.
The Cooling Process
After about 40 to 45 minutes total in the oven, they should look golden brown. Pull the pan out. Now, they will actually feel kind of soft and sticky right out of the oven. Don’t panic!
The xylitol hardens up perfectly as it cools down to room temperature. Just let the pan sit on the counter for at least 20 minutes before you try to eat them. Once they are cool, your Cinnamon and Xylitol Roasted Pumpkin Seeds will have that amazing, glass-like crunch.
They store really well in a glass mason jar for about a week, if your family doesn’t eat them all on the first day!

Wrapping things up, baking a batch of Cinnamon and Xylitol Roasted Pumpkin Seeds is the absolute best way to use up your Halloween carving leftovers. I love that I don’t have to throw anything away anymore.
You get a deliciously crunchy, sweet treat without wrecking your health goals or dealing with a crazy sugar crash. My students always beg me to bring these healthy fall snacks into the classroom for our autumn parties, and I love sharing them.
I really hope my past kitchen mistakes help you make the perfect batch on your very first try! If you found this recipe helpful, please save it and share it on your favorite Pinterest recipe board. It helps my blog out a ton and lets other people discover how amazing sugar free pumpkin seeds can actually be!