Did you know that the average person spends over 60 hours a year just deciding what to eat? Honestly, I used to be the queen of the 9 PM cereal bowl because I was too tired to cook. But once I started using Chicken and Broccoli Meal Prep Containers, my whole week changed! In this guide, we’re diving into how to keep your greens crunchy, your chicken juicy, and your fridge organized.
I can’t tell you how much money I used to waste on those greasy takeout apps just because I didn’t have a plan. It’s honestly kind of embarrassing when I look back at my bank statements from a few years ago. Now, when I walk through the door after a long day at school, I don’t have to think at all. I just reach into the fridge and grab one of my pre-made meals. It feels like a little gift to my future self every time I see those neat rows of food sitting there ready to go. Plus, my family actually eats this without complaining, which is basically a miracle in my house. We’re going to look at everything from the best boxes to buy to the tiny tricks that stop your broccoli from smelling like… well, old broccoli. It’s way easier than you think to get started, even if you aren’t a pro in the kitchen.

Why Your Choice of Containers Makes or Breaks Your Meal Prep
I’ve been prepping my lunches for a long time now, and I’ve learned the hard way that the box you put your food in is just as important as the food itself. One time, I used a cheap plastic tub I found in the back of my cabinet. I heated up my chicken and broccoli at work, and the plastic actually started to smell funny and warp. It was pretty gross and I didn’t even want to eat my lunch after that. If you want your Chicken and Broccoli Meal Prep Containers to actually work for you, you have to pick the right ones from the start.
Most people ask me if they should get glass or plastic. I usually tell them to go with glass. Glass doesn’t get those weird orange stains from sauce, and it doesn’t hold onto smells from last week’s dinner. Plus, you can put glass right in the microwave or even the oven without worrying about plastic chemicals leaking into your veggies. It’s a bit heavier to carry in your work bag, but it stays nice for years. Plastic is okay if you are on a tight budget, but make sure it says “BPA-free” on the bottom so you stay safe.
The lids are really the most important part. You need lids that snap on tight and have a good rubber seal. There is nothing worse than opening your bag and seeing broccoli juice all over your phone or work papers, it’s just a mess. I always look for the word “airtight” when I’m shopping. This keeps the air out so your chicken doesn’t get dry and tough. It also keeps your broccoli looking green instead of letting it turn that sad grey color after two days in the fridge.
If you don’t like your food touching, you might want to look at containers with dividers. These have little walls inside to keep the chicken on one side and the greens on the other. This is helpful for keeping the textures right. If you are just starting out, don’t get too stressed about it. Just try to get a set of 5 or 10 matching containers. It makes your fridge look organized and it’s way easier to find the matching lids in your kitchen drawer when you’re in a hurry on Sunday night.

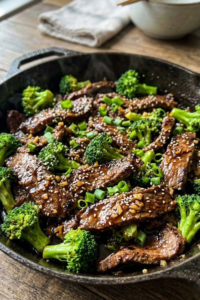
My Go-To Garlic Ginger Chicken and Broccoli Recipe
I’ve made a lot of mistakes in the kitchen over the years, but this garlic ginger recipe is one thing I actually got right. It is my favorite thing to put in my Chicken and Broccoli Meal Prep Containers because it actually tastes good on Thursday, not just on Sunday. Most healthy food gets boring after a day or two, but the ginger in this keeps it tasting fresh.
The biggest trick I learned for the meat is something called “velveting.” It sounds like something for a sewing class, but it’s just putting a little cornstarch on the chicken before you cook it. This creates a tiny barrier that keeps the juices inside. It keeps the chicken from getting dry like a piece of cardboard when you heat it up in the office microwave later. I just toss the chicken pieces in a bowl with a spoonful of cornstarch and a splash of soy sauce before hitting the pan.
For the broccoli, I used to steam it until it was mushy and gross. Don’t do that. It gets even soggier when it sits in the fridge. Now, I roast my broccoli in the oven with a bit of olive oil and salt at 400 degrees for about 15 minutes. It stays a little bit crunchy which is way better. If you’re in a rush, you can pan-fry it with the chicken, but roasting gives it that brown, toasted flavor that makes you actually want to eat your greens.
The sauce is super fast and way better than the stuff you get at the mall. I just mix soy sauce, a little honey, a bunch of fresh garlic, and some ginger. If you don’t have fresh ginger, the stuff in the squeeze tube from the grocery store works fine too. I pour it over the chicken right at the end of cooking so it gets thick and sticky.
When I finally put everything in my containers, I let the food cool down for a few minutes on the counter first. If you close the lid while it’s still steaming hot, the steam turns into water drops and makes the broccoli a soggy mess. This recipe is really simple, but it’s the one I keep going back to every single week because it works.
Storage and Reheating Hacks for Maximum Freshness
Storing your food is where most people mess up. I used to just throw everything into my Chicken and Broccoli Meal Prep Containers as soon as the stove was off. I’d snap the lids on tight and put them in the fridge right away. The next day? My lunch was a swamp. There was so much water in the bottom from the steam that it ruined the whole thing. Now, I let the food sit out on the counter for maybe 20 minutes. You want it to stop steaming before you seal it up. This keeps the broccoli from getting that mushy texture that nobody likes.
For the microwave, don’t just hit the ‘3 minutes’ button and walk away. That’s how you get chicken that feels like you’re chewing on a rubber band. I usually put a damp paper towel over the top of the container. This adds a little moisture back in so the meat stays soft. Also, try cutting your chicken into smaller, even pieces when you first cook it. It helps everything heat up at the same speed so you don’t have cold spots and lava spots in the same bowl.
People always ask me how long these meals stay good. Honestly, I wouldn’t keep them for more than four days. I usually prep on Sunday night, and by Thursday, the chicken starts to lose its flavor and the broccoli gets a bit sad. If you need food for Friday, maybe make a fresh batch on Wednesday night. If you use good airtight Chicken and Broccoli Meal Prep Containers, you can really taste the difference on day three compared to using just a random bowl with some plastic wrap over it.
One last tip: if you’re freezing these, leave a little space at the top. Food expands when it freezes, and I’ve actually had a glass container crack because I stuffed it too full. Just leave about half an inch of room and you’ll be fine. It’s these little things that make your meal prep actually taste like real food instead of leftovers.

Honestly, getting into a routine with Chicken and Broccoli Meal Prep Containers changed how I feel about my whole week. I used to spend so much money on takeout or just eat random snacks for dinner because I was too tired to cook after work. Now, I just grab a container from the fridge and I’m good to go. It’s about giving yourself a break when things get busy and not having to think so hard about what to eat every single day.
If you follow the tips I shared—like getting the right glass containers and letting your food cool down before you shut the lid—you’ll find that healthy eating isn’t actually that hard. It just takes a little practice on Sunday afternoons. Don’t get discouraged if your first batch isn’t perfect; mine sure wasn’t! I had many days of soggy broccoli before I figured out the tricks. Just keep at it, and soon it will feel like second nature.
If you found these tips helpful for your meal planning, please save this post to your Pinterest “Healthy Recipes” board so you can find it later!