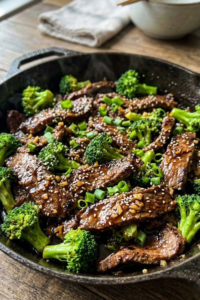
I used to think healthy food was basically a punishment, but man, was I wrong! Did you know that nearly 70% of home cooks admit to overcooking their poultry? It’s a tragedy, really. This Grilled Chicken and Broccoli recipe changed everything for me. It’s fast. It’s fresh. It’s got that smoky char that makes you feel like a backyard hero! If you’re tired of rubbery meat and mushy greens, you’ve come to the right place. Let’s get grilling!

Mastering the Marinade: Why Your Chicken is Dry
I remember the first time I tried making Grilled Chicken and Broccoli for my family. It was a total disaster, honestly. The chicken was so dry it felt like I was chewing on a piece of luggage. My kids just looked at me with those “are we really eating this?” eyes. It was pretty embarrassing, but it taught me a huge lesson about how meat works on a grill.
The mistake I made was thinking the grill would do all the work. I just threw the meat on there with a little salt. Big mistake! You have to give the meat some love before it hits the heat. If you put “naked” chicken on a hot grate, the moisture escapes faster than you can flip it.
A good marinade needs three things: oil, acid, and flavor. I usually go with olive oil, lemon juice, and way more garlic than you think. The acid helps break down the tough fibers so the meat stays tender. If you skip the oil, the chicken will stick to the grates like glue, and you’ll lose all that good skin and flavor when you try to turn it.
I found that adding a splash of soy sauce is a game-changer. It adds that “umami” thing people talk about—that deep, savory taste. Just don’t let it sit for more than four hours. If you leave it too long, the lemon juice starts to cook the meat and it gets mushy. I once left my chicken in the fridge overnight in a heavy vinegar mix. It was gross. The texture was like wet chalk, and I had to order pizza. Learn from my fails, folks!
You also need to let the meat sit out for about ten minutes before you start grilling. If the chicken is ice cold, the outside burns while the inside stays raw. That’s a classic rookie move I still make sometimes when I’m in a hurry.
Finally, use a meat thermometer to check for 165 degrees. Don’t just poke it with your finger and guess. I used to guess, and half the time it was still pink inside or way overdone. Now I check every single piece to make sure it’s safe and juicy.

The Secret to Perfectly Charred Broccoli
Now, let’s talk about the green stuff. I’ve seen so many people ruin perfectly good broccoli on the grill. They either undercook it so it’s like eating a tree branch, or they turn it into a pile of black soot. For a long time, I just stuck to steaming it in the microwave because the grill felt too hard to get right. But once I figured out the oil trick, everything changed for my Grilled Chicken and Broccoli dinners.
The biggest secret is oil coverage. You can’t just drizzle a little bit on top and hope for the best. You need to toss the florets in a big bowl until every little nook and cranny is coated. If you miss a spot, that part of the broccoli will just dry out and burn instead of getting that nice brown char. I usually use about two tablespoons of oil for a big head of broccoli.
I also highly suggest getting a grill basket. If you try to put small pieces of broccoli right on the grates, half of them are going to fall into the fire. It’s super annoying to watch your dinner disappear into the coals! A basket lets you shake them around so they cook evenly. If you don’t have a basket, try cutting the broccoli into really big pieces—almost like “steaks”—instead of small florets.
You’re looking for what I call “crunch-tender.” You want those dark, crispy edges but the stem should still have a little bite to it. It usually takes about 8 to 10 minutes over medium heat. Don’t walk away to check your phone! Broccoli goes from perfect to burnt in about thirty seconds. I’ve burned more batches than I care to admit because I got distracted by a text message or the dog.
How to get the best results:
- Dry it off: Make sure the broccoli is totally dry before adding oil. If it’s wet, it’ll just steam instead of charring.
- Season late: Add your salt and pepper right before it goes on the heat so it doesn’t pull the moisture out too early.
- The Squeeze: A squeeze of fresh lemon right when it comes off the grill makes the flavor pop. It cuts through the smoky taste perfectly.

Essential Grilling Tools for Success
I’ve been a teacher for a long time, and if there’s one thing I tell my students, it’s that having the right tools makes the job much easier. You wouldn’t try to grade a stack of papers with a broken pencil, right? Grilling is the same way. To get the best Grilled Chicken and Broccoli, you need a few basic things in your kit that actually work.
First, you really need a digital meat thermometer. I can’t stress this enough. For years, I just “eyeballed” it. I thought I was some kind of grill master who could tell by touch. Then one night, I served chicken that looked great on the outside but was totally raw in the middle. It was so embarrassing! Now, I always check for that 165-degree mark. It is the only way to be certain your food is safe and juicy.
Second, please put down that giant BBQ fork. I used to love stabbing the meat to turn it over. I thought it made me look like I knew what I was doing. But every time you poke the chicken, the juices run out. It’s like popping a water balloon! Use a good pair of tongs instead. They grip the food without ruining the texture.
Also, keep your grates clean. I used to be pretty lazy and would leave the old burnt bits from the last cookout on there. I told myself it added “charcoal flavor.” I was wrong. It just made my fresh chicken and broccoli taste like old, bitter grease. Give the grill a good scrub with a brush while it is heating up. It makes a world of difference for the sear.
My “Must-Have” List:
- Digital Thermometer: Takes the guessing out of the game.
- Long-Handled Tongs: Saves your hand from the heat and keeps the juice inside the meat.
- Grill Brush: Keeps the flavor clean and prevents sticking.
- Heat-Resistant Mitts: Because burning your hands is never part of a good recipe!

Meal Prep and Storage Hacks
I love Sundays. It is the one day I feel like I actually have my life together because I meal prep for the week. I used to pack five days of this Grilled Chicken and Broccoli into those cheap plastic bins. But by Wednesday, the chicken was so tough I could barely cut it. My “healthy” lunch felt like a chore to eat, and I usually ended up hitting the vending machine for a bag of chips instead. It was a total waste of money and effort!
The trick to making your leftovers taste good is all about how you store them. I finally switched to glass containers. They don’t hold onto old smells like plastic does, and they heat up much more evenly. Plus, you can see exactly what you have in the fridge so you don’t forget about it and find a science project in the back of the shelf two weeks later. I’ve done that more times than I want to admit.
When you go to reheat your meal, don’t just blast it on high for three minutes. That is a fast way to get rubbery meat. I always put a damp paper towel over the top of the dish. This creates a little bit of steam that keeps the chicken juicy. I also try to keep the broccoli and chicken in separate piles in the dish. That way, the broccoli doesn’t get totally mushy while the chicken is getting up to temperature.
If you get bored of eating the same thing every day, try mixing it up. On Monday, I eat it just as it is. On Tuesday, I might chop the chicken up and throw it over a big bed of spinach with some ranch dressing. By Thursday, I’ll toss the leftovers with some rice and a little extra soy sauce for a quick stir-fry. It’s the same food, but it feels like a whole new meal. This keeps me from getting bored and ordering takeout.

So, there you have it! Making Grilled Chicken and Broccoli doesn’t have to be a chore if you follow these tips. Just remember to marinate well, watch your temps, and don’t be afraid of a little char on your greens! It took me a few burnt batches to get it right, but now it’s a weekly staple in my house. If you enjoyed this guide, please share it on Pinterest so others can stop eating dry chicken too! Happy cooking!