Listen, if you’re like me, Tuesday nights usually feel like a marathon you didn’t sign up for! I used to spend way too much money on subpar takeout because I was “too tired” to cook. But then I discovered Ground Beef and Broccoli Meal Prep, and honestly? It’s a total game-changer for my sanity and my wallet.
Did you know that meal prepping can save the average person over $2,400 a year? That’s a whole vacation! This recipe is all about that savory, salty, slightly sweet vibe we love from Chinese takeout, but without the mystery oils or the heavy bloating afterward. Let’s get into how to make your future self very, very happy.
I remember when my fridge used to be just a graveyard for half-used jars of mayo and wilted spinach. I’d come home from a long day at school, look at the stove like it was an alien machine, and just reach for my phone to order delivery. It felt like I was paying a “tired tax” every single week, and my bank account was definitely feeling the sting.
But once I started making these beef and broccoli bowls on Sundays, everything changed. There is something so satisfying about opening the fridge and seeing those neat rows of containers waiting for you. You don’t have to think, you don’t have to chop anything, and you certainly don’t have to wait 45 minutes for a delivery driver. It takes the stress out of the “what’s for dinner?” debate and gives me back about an hour of my evening every single night. Plus, it’s one of the few healthy meals that actually tastes better the next day after the flavors have had a chance to really get to know each other.

Choosing the Best Beef for Your Bowls
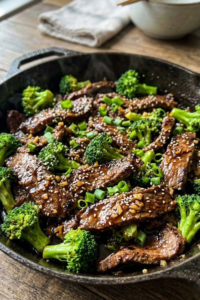
To be honest, picking the right meat is the most important part of this whole process. If you grab something with too much fat, your broccoli is going to be swimming in a pool of grease by Wednesday. I usually stick with 90/10 or 95/5 lean ground beef. It stays juicy enough to taste good, but it won’t leave that weird, heavy film on the roof of your mouth after you reheat it in the office microwave.
If you see it on sale, grass-fed beef has a much richer flavor that stands out against the ginger and garlic. But really, the regular stuff from the grocery store works just fine. The real trick isn’t just the meat, it’s how you cook it. Don’t just dump it in and stir it around until it’s gray. Let it sit in the hot pan for a few minutes without touching it. You want those dark brown, crispy bits—that’s where the actual flavor lives! If the meat is just gray and steamed, the whole meal prep is going to be pretty bland.
I also like to make sure the beef is at room temperature for about ten or fifteen minutes before it hits the pan. If it’s ice-cold, it just drops the temperature of your skillet and you end up boiling the meat in its own juices instead of searing it. I usually break the big block of meat into smaller chunks with my hands first so I don’t have to fight with it once it starts cooking. Another thing I’ve noticed is that you shouldn’t overcrowd the pan. If you’re doubling this recipe for a big family, do the beef in two batches so every bit gets that nice crust. I’ve tried using ground turkey before to save even more calories, but it just doesn’t satisfy that craving for a hearty steak-like dinner the way beef does. Plus, the iron in the beef keeps me feeling energized throughout my afternoon classes. It’s a small detail, but getting that deep sear makes the difference between a “sad desk lunch” and something you actually look forward to eating when the clock hits noon.

Prepping Broccoli for Maximum Crunch
I’ve learned the hard way that soggy broccoli is the fastest way to ruin a good meal prep. You want it to have that nice “snap” when you bite into it, even on Thursday. The secret is all in how you chop it. I try to keep all my florets roughly the same size—about the size of a large marble. If some are huge and some are tiny, the small ones turn into mush while the big ones stay raw. It’s a mess.
When it comes to cooking, I do a quick “steam-sauté” in the same pan I used for the beef. I add a tiny splash of water and cover it for just two minutes. This keeps that bright green color looking fresh. If you’re using frozen broccoli because it’s cheaper or easier (we’ve all been there!), make sure you thaw it and pat it dry with a paper towel first. If you skip that, you’ll end up with a watery sauce, and nobody wants that.
I always tell my students that patience is a virtue, but when it comes to broccoli, speed is your best friend. You really have to keep an eye on the clock because thirty seconds can be the difference between “perfectly crisp” and “cafeteria mush.” I also like to use the stalks, not just the tops! If you peel the tough outer skin off the stems and slice them thin, they actually have a really sweet flavor and a great crunch that most people just throw away.
Don’t be afraid to let the broccoli hit those brown bits left over from the beef in the pan before you add the water. That’s called “fond,” and it’s basically free flavor that makes the vegetables taste like they’ve been roasting for hours. If I’m feeling fancy, I’ll even toss in a pinch of salt right as the steam starts to rise to lock in that vibrant green. Another trick is to move the broccoli straight out of the hot pan and onto a cold plate once it’s done. If you leave it in the pan with the heat off, it just keeps cooking and loses its texture. It might seem like a lot of steps for a simple vegetable, but trust me, your future self will be so happy when Friday rolls around and your lunch still has a satisfying bite to it.

The “Secret” 5-Minute Stir-Fry Sauce
If you’ve ever wondered why restaurant beef and broccoli tastes so much better than the stuff you make at home, it’s usually the sauce. For a long time, I just dumped a bottle of store-bought teriyaki over everything and called it a day. It was fine, but it was always too sweet or too thin. Now, I make my own, and it takes less time than it does to find the cap to the soy sauce bottle.
I use a mix of soy sauce (or coconut aminos if you’re avoiding gluten), a big spoonful of minced garlic, and some fresh ginger. If you don’t have fresh ginger, the stuff in the squeeze tube works in a pinch. The real “pro teacher” move here is adding a tiny bit of cornstarch mixed with water at the very end. It turns that thin liquid into a glossy, thick sauce that actually sticks to the beef and broccoli instead of just puddling at the bottom of your meal prep container.
I used to be scared of making my own sauces because I thought I needed twenty different spices I’d never use again. But honestly, the simpler you keep it, the better it tastes. I always add a tiny splash of toasted sesame oil right before I pull the pan off the burner. You don’t want to cook with the sesame oil because it burns fast, but adding it at the end gives it that nutty smell that makes your neighbors jealous.
If you like a little heat, throw in a handful of red pepper flakes while the garlic is simmering—it wakes everything up without making your mouth catch on fire. I also found that a teaspoon of brown sugar or honey really balances out the saltiness from the soy sauce. It helps the sauce caramelize on the beef so you get those sticky, delicious edges. Don’t worry if the sauce looks a bit too thick in the pan; once you mix in the beef and the broccoli releases a little more of its juice, it’ll be the perfect consistency. This is the part of the recipe where you can really play around and make it yours, so don’t be afraid to taste it as you go!

Storage and Reheating Tips for Success
When I first started meal prepping, I’d just throw everything into any random plastic bowl I found in the cupboard. Big mistake. By Wednesday, the beef would taste like the plastic container and the broccoli would be a sad, gray mess. Now, I strictly use glass containers with those snap-on lids. They keep the air out much better, and you don’t have to worry about weird chemicals leaching into your food when you heat it up.
Speaking of heating it up, here is a little trick I tell everyone: before you pop the lid back on to microwave it, sprinkle a tiny bit of water over the beef. It creates a little steam bath inside the container so the meat stays tender instead of turning into little pebbles of leather. Also, if you’re planning to freeze these, they actually hold up pretty well for about two months. Just make sure the food is completely cool before you put the lid on and stick it in the freezer, otherwise, you’ll get ice crystals all over your dinner.

I really hope this Ground Beef and Broccoli Meal Prep makes your busy 2026 week feel just a little bit easier! It’s savory, filling, and so much better than the alternatives. I’ve found that having these ready in the fridge stops me from making bad choices when I’m tired and hungry. Give it a shot this Sunday, and your Wednesday-self will thank you.
Love this idea? Hover over the image below to pin it to your Pinterest “Healthy Dinners” board!