There is no love sincerer than the love of food,” George Bernard Shaw once said, and honestly? He was absolutely right! Especially when that food involves crispy chicken coated in a sticky, sweet-and-savory glaze. I remember the first time I tried to make “takeout” at home; it was a soggy disaster. But let me tell you, discovering the magic of the air fryer changed everything for me!
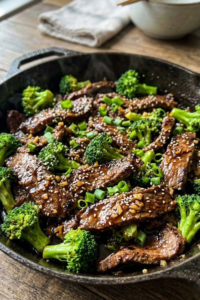
This recipe for Honey Garlic Chicken Bites (Air Fried) is my go-to when I want that addictive restaurant flavor without the deep-frying mess. We are talking about tender chunks of chicken breast, air-fried to golden perfection, and tossed in a sauce so good you’ll want to lick the spoon. Whether you are a busy parent or just hungry right now, this dish delivers.
: The Best 20-Minute Meal of 2026 1")
Why You Need These Air Fryer Chicken Bites in Your Life
I used to be that person who thought “healthy” chicken recipes meant dry, sad rubber that nobody wanted to eat. I remember trying to make sweet and sour chicken in a wok about ten years ago, and let me tell you, it was a hot mess. There was oil splattered all over my stove, the batter fell off, and the kitchen smelled like a grease trap for three days.
It was a total disaster.
But honestly, discovering Honey Garlic Chicken Bites (Air Fried) changed the game for my weeknight dinners. I was skeptical at first—how could blowing hot air around make something taste fried? But it does. And now, I’m obsessed with getting that sticky, savory fix without the cleanup nightmare.
The Healthier Way to Crunch
Deep frying is a pain, and it’s not exactly great for your heart either. When you deep fry, the chicken acts like a sponge, soaking up way more oil than you realize.
With this air fryer method, you cut the fat down significantly. You literally just need a light spray of avocado or olive oil to get that crispy coating. My doctor is happier with my cholesterol, and my jeans are fitting a little better too. It’s a win-win situation where you don’t have to sacrifice the texture you love.
Speed is Everything
Look, I’m a teacher. By the time I get home, grade papers, and deal with my own kids, I have zero energy left. I don’t have time to preheat a massive oven or stand over a stove stirring for an hour.
These chicken bites go from the fridge to your plate in under 20 minutes. It is quicker than ordering delivery, and it definitely tastes fresher. You just toss the cubes in the basket, shake it once or twice, and boom—dinner is served.
Picky Eater Approved
My youngest kid goes through phases where he won’t eat anything green or anything with a “weird” texture. It is incredibly frustrating.
But there is something about the sweetness in these Honey Garlic Chicken Bites (Air Fried) that hooks him every time. The honey masks the strong garlic bite just enough so it’s not overpowering. I usually throw them over some rice, maybe sneak a few broccoli florets on the side, and the plate gets cleaned. If you can get a picky seven-year-old to ask for seconds, you know you’ve found a keeper.
: The Best 20-Minute Meal of 2026 2")
Ingredients for the Perfect Honey Garlic Glaze
You don’t need a fancy pantry to make this. Honestly, most of these ingredients are probably already sitting in your kitchen right now. I usually just grab whatever I have, but over the years, I’ve learned that a few specific swaps make a huge difference in how it tastes.
Choosing Your Chicken
I used to strictly buy chicken breasts because I thought they were “healthier.” But let’s be real, they dry out so fast if you aren’t careful. For this recipe, you can use breasts or thighs.
Personally, I prefer boneless, skinless chicken thighs. They stay way juicier in the air fryer and have a lot more flavor. If you use breasts, just make sure you don’t cut the pieces too small, or they’ll turn into rocks. Aim for 1-inch cubes. It helps them cook evenly so you don’t end up with some burnt pieces and some raw ones.
The Sauce Trinity
The sauce is where the magic happens. It is sticky, sweet, and covers up any mistakes you might have made with the chicken.
- Honey: Just use regular clover honey. You don’t need the expensive raw organic stuff for a glaze that you’re going to heat up.
- Garlic: Please, I am begging you, chop up fresh garlic cloves. I know the jar of minced garlic is easier (I have one in my fridge too), but fresh garlic gives it that punch you want. I use a garlic press because I hate chopping it by hand.
- Soy Sauce: I always grab the low-sodium kind. The regular stuff makes the dish way too salty once the sauce thickens up. If you are gluten-free, Tamari works perfectly here too.
Cornstarch is the Secret
This is the part I messed up for years. I used to use flour to coat my chicken, but it always ended up tasting doughy or powdery in the air fryer.
You have to use cornstarch. It creates a much lighter, crispier coating that actually crunches when you bite into it. It mimics that deep-fried texture without the gallon of oil. Just toss the chicken in a bag with the cornstarch and shake it until it looks like little ghosts. It’s messy, but it works.
Optional Kick
If your family handles spice better than mine, adding a pinch of red pepper flakes or some fresh grated ginger really wakes up the sauce. My kids complain if it’s “too spicy,” so I usually leave it out, but when I make it for just me and my husband, I definitely add the heat.
: The Best 20-Minute Meal of 2026 3")
How to Make Honey Garlic Chicken Bites (Air Fried)
Okay, this is the part where it actually happens. It is honestly super simple. I have made this on days where I can barely keep my eyes open, and it still turns out great.
Prep the Chicken
First, get your chicken cut up. Like I said before, try to keep the pieces the same size so they cook at the same speed. I usually pat the chicken dry with a paper towel first—if it is too wet, the coating gets kind of gummy instead of crispy.
Season the bare chicken with a little salt and pepper. Nothing fancy yet.
The Shake Method
I hate getting my hands covered in raw egg and flour. It is the worst feeling. So, I use a big gallon-sized ziplock bag for this.
Put your cornstarch in the bag. Dump the chicken cubes in. Zip it shut (double check this, or you will have a snowstorm in your kitchen). Then just shake it like crazy. My kids fight over who gets to do this part. You want every piece coated in a fine layer of white powder. Shake off the excess cornstarch when you pull them out.
Air Frying Time
Preheat your air fryer to 400°F (200°C). I know some people skip preheating, but I think it helps get that initial sear.
Place the chicken in the basket in a single layer. Do not stack them. If you pile them up, they just steam each other and get soggy. You might have to do two batches if you have a small air fryer.
Spray the chicken generously with cooking spray. This helps get rid of those dry white floury spots.
Cook for about 10 to 12 minutes. Halfway through, around the 6-minute mark, pull the basket out and give it a good shake to flip the pieces around. You want them golden brown and crispy on all sides.
Making the Sauce
While the chicken is doing its thing in the fryer, grab a small saucepan. Combine your soy sauce, honey, and minced garlic.
Turn the heat to medium. Let it bubble gently. It will start to smell really good in your kitchen. If you want it thick like syrup, you can mix a tiny teaspoon of cornstarch with water and pour it in, but usually, letting it simmer for 3-4 minutes does the trick. It should coat the back of a spoon.
Toss and Serve
Once the chicken is done and looks crispy, dump it immediately into a large bowl. Pour that hot, sticky sauce right over the top.
Toss it all together until every piece is shiny and coated. Serve it right away—it is best when it’s hot!
: The Best 20-Minute Meal of 2026 4")
Pro Tips for Ultra-Crispy Air Fryer Results
I have learned the hard way that air frying isn’t exactly “set it and forget it.” There are a few little things you have to do if you want that crunch that sounds loud when you chew. If you skip these, you might as well just use the microwave.
The Single Layer Rule
I can’t stress this enough: do not crowd the basket. It’s like when I have thirty kids in my classroom during flu season—bad things happen when everyone is too close together.
If you stack the chicken pieces on top of each other, the air can’t circulate. Instead of frying, the chicken just sweats and steams. You end up with soggy, pale mush. I know it is annoying to cook in two batches when you are hungry, but it is worth the extra ten minutes.
Fix the White Spots
Sometimes when you pull the chicken out, you might see little white powdery spots where the cornstarch didn’t get cooked. This doesn’t look appetizing.
My trick is to keep the cooking spray handy. About halfway through cooking, when you shake the basket, look for those dry spots. Give them a quick spritz of oil. The oil hits the hot air and crisps up that starch instantly.
Shake It Up
You have to shake the basket. I usually do it a couple of times while it cooks. It helps the pieces tumble around so they get brown on all sides, not just the top.
Don’t Guess the Temp
I used to just guess when meat was done by poking it. I served a lot of dry chicken that way. Get a cheap digital meat thermometer. You want the chicken to hit 165°F. The second it hits that number, pull it out. If you leave it in “just to be safe,” it turns into rubber.
: The Best 20-Minute Meal of 2026 5")
Serving Suggestions and Pairings
My family would riot if I just served a bowl of chicken for dinner, so I have to bulk it up. Since the sauce is pretty rich, you want sides that are simple.
- Rice is Life: We almost always eat this with Jasmine rice. It cooks fast and it soaks up all that extra honey garlic sauce that pools at the bottom of the bowl. Brown rice works too if you are trying to be better about whole grains.
- Green Stuff: You need something fresh to cut through the saltiness. Steamed broccoli is the easiest option—I just throw a bag in the microwave. Stir-fried snap peas or green beans are also really good if you have the energy.
- The Fancy Finish: If I want to feel like a professional chef, I sprinkle sesame seeds and chopped green onions on top. It literally takes ten seconds but it makes the plate look like it came from a restaurant.
: The Best 20-Minute Meal of 2026 6")
Storing and Reheating Leftovers
If you are lucky enough to have leftovers (which is rare in my house with two teenagers), you need to store them right.
Put the chicken in an airtight container in the fridge. It stays good for about 3 or 4 days.
Do not use the microwave to reheat this.
I repeat: step away from the microwave. If you nuke fried chicken, the breading gets soggy and the chicken gets tough. It is gross.
Instead, throw the leftovers back in the air fryer at 350°F for about 2 or 3 minutes. It crisps the coating right back up and warms the sauce without ruining the texture. It tastes almost as good as fresh.
: The Best 20-Minute Meal of 2026 7")
These Honey Garlic Chicken Bites have saved me from the drive-thru line more times than I can count. They are sticky, crunchy, and honestly just delicious. Plus, clean-up is a breeze since you aren’t dealing with a pot of hot oil.
I hope this makes your dinner rush a little easier this week. If you try it, let me know how it turned out!
Call to Action: Did you love this recipe? Don’t forget to pin this image to your “Quick Dinners” board on Pinterest so you can find it later!